1. Connecting to your charger
1.1 Download the App and Login
- Download and open the Autel Charge App from the App Store on your mobile device.
1.2 Connect to the Charger
Once your account is set up and you’re logged in:
- Power on the charger and wait for the Power LED to light up
-
In the app, go to Settings and tap Add My Home Charger.
- Then, tap Add Manually
You can connect the charger using any of the following two methods:
Option 1: Scan the QR Code
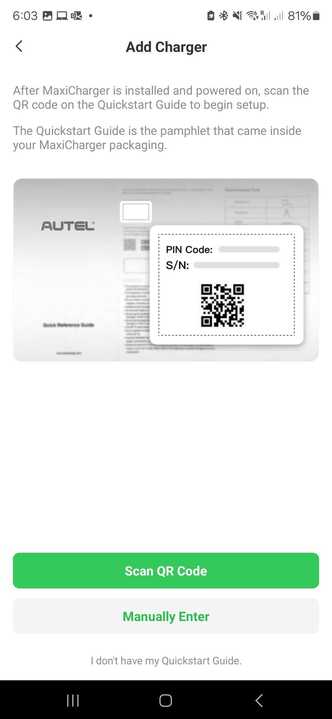
- Tap Scan and allow camera access
- Point your phone’s camera at the QR code located on the right side of the charger
- If the scan fails after 30 seconds, you can choose to enter the serial number
- Enter the PIN to successfully add it to your account. This PIN would be provided with the charger. If you do not know the PIN, contact Autel support.
Option 2: Enter the Serial Number
- Tap Enter Serial Number
- Type the serial number found on the charger’s label on the right side of the charger
- Tap Link
- Enter the PIN to successfully add it to your account. This PIN would be provided with the charger. If you do not know the PIN, contact Autel support.
2. Connecting your charger to the Internet
- Select your home Wi-Fi network from the list.
- Enter your network’s Wi-Fi password.
- Tap Save.
- Wait for confirmation — the Internet LED should turn green once connected.
3. Ensure the firmware is Up to date
- Go to your Autel Charge home page.
- Tap the gear icon in the top left corner.
- Select the arrow next to “My Charger”
- Scroll down to the Firmware Update section
4. Configure OCPP servers in Autel Charge App
- Go to your Autel Charge App home page.
- Tap the gear icon in the top left corner.
- Select OCPP Server.
- OCPP Server list view:
- Tap on the following server and then tap Connect:
ChargeLab WSS - The connection will show up as successful
5. Add your charger to dashboard
Please review the article below and follow the steps to add your charger to the Site Host Dashboard. If you experience any issues or need assistance, don’t hesitate to contact our Deployments Team at deployments@chargelab.co.